#naileditfridaybeautychristmas nailchristmas nailartnail artnail art tutorialnail tutorialnailartクリスマスネイルネイル アートネイルアート
[Nail x #Naileditfriday x Tutorial] Christmas Nail Art Ideas & Tutorial
Hello everyone~!!! It's already December (OMGSH 2014 just flew by!!!)
That also means it's almost...
Christmas!
That also means it's almost...
Christmas!
I've thought of a few nail art ideas for your fingers to join in on the festive season!
Here's the nail arts I'll be introducing on this tutorial~

You can just do a few of the designs or do the same design


1. Snowman

Yes there's no snow in Singapore... but that doesn't mean we can't have a snowman right~?
"Do you wanna build a snow~ma~n?" (Frozen)
YES WE WILL!


(#GL21 from Arelia)
2. White Polish - for the snowman!
(Art Nail polish from Daiso)
3. Red Polish - for the scarf/muffler
(Art Nail from Daiso)
4. Black Polish - for the hat, nose, eyes, and button
(Art Nail from Daiso)
5. Yellow Polish - for the scarf/muffler pattern
(Banana Split from Sephora)
Steps:

2. Use the white polish to create 2 circles
(the bigger one on the bottom and a slightly smaller one on top)
3. Fill in the circle
4. Use the black polish to create a hat
(you can make it into a bucket too!...but I didn't have enough space LOL)
5. Use the red polish to create a muffler/scarf for your snowman!
6. Add a few dots of yellow to create a pattern!
7. Use the black polish again to dot on the snowman's eyes, mouth, and buttons!
8. Apply top coat
2. Christmas Wreath
Whenever I think about Christmas, I think about the Christmas Wreath and how...
I have no clue what it is. LOL
Regardless it reminds me of Christmas so... decided to do a nail art of it!


(#GL21 from Arelia)
2. White Polish - for the face & body details
(Art Nail polish from Daiso)
3. Red Polish - for the bow
(Wine Red from Matte Wine)
4. Green Polish - for the wreath
(Matte Green from L'Cret)
5. Yellow Polish - for the decoration
(Banana Split from Sephora)

2. Use the green polish to create a donut shape
3. You can use any colors you want to dot the decoration! I used yellow, red, and gold polish!
6. Use the red polish to draw a bow!
7. Apply top coat.
3. Rudolph

Rudolph the red nose reindeer~ had a very shiny nose~♪
And we are gonna draw him (draw him)
In the tutorial be~low~!♪


1. Dark Brown Polish - to outline Rudolph
(A139 from PA)2. Brown Polish - for Rudolph
(A28 from PA)
2. White Polish - for the finishing touch for Rudolph's nose
(Art Nail polish from Daiso)
3. Red Polish - for Rudolph's nose
(Wine Red from Matte Wine)
4. Black Polish - for Rudolph's eyes
(Art Nail polish from Daiso)
5. Gold Polish- for the base
(#GL21 from Arelia)
Steps:

2. Use the brown polish to make a dome/circle shape
3. Use the same brown polish to create the ears for Rudolph
4. Outline Rudolph with a slightly darker brown
5. Use the same dark brown to draw the antlers. It doesn't have to be perfect or symmetric!
6. Use the black polish to draw Rudolph's eyes
7. Use the red polish to draw...RUDOLPH'S SHINY RED NOSE!
8. Finish off with a dab of white polish to create that... reflection thingy.
9. Apply top coat.
4. Santa Hat
Who doesn't love wearing a Santa hat during Christmas! (I DO!)
So decided to do a simple nail art of Santa's hat!

1. White Polish - for the pompom & base of the Santa Hat
(Art Nail polish from Daiso)2. Red Polish - for the Santa hat
(Art Nail from Daiso)
Steps:
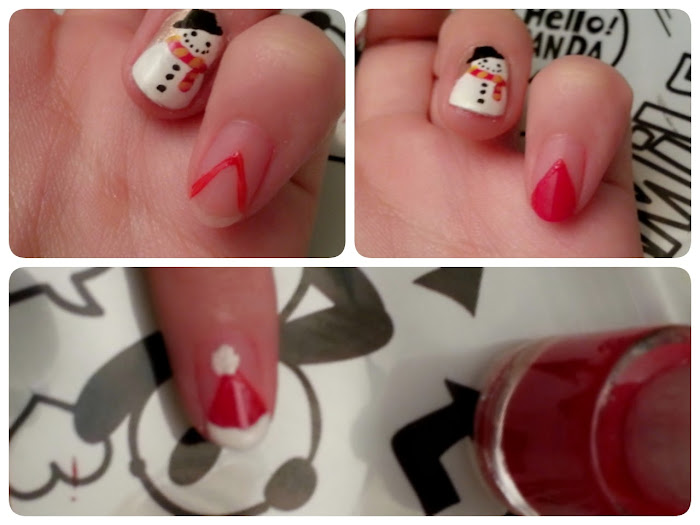
2. Fill in the triangle
3. Use the white polish to create the pompom and the base of the Santa hat
(make sure the red polish is completely dry!)
4. Apply top coat
5. Santa! (Mario/Block vers.? lol)
This is a relatively simple nail art because I realized I can't draw a nose for Santa using my right hand...
So I decided to make it super easy so that you can even use your non-dominant hand to draw it!
It's similar to the previous Santa Hat nail art, just that you're adding on the eyes & beard!


(Art Nail polish from Daiso)
2. Red Polish - for Santa's hat
(Art Nail from Daiso)
3. Black Polish - for Santa's eyes
(Art Nail from Daiso)
Steps:

2. Use the Red polish to fill in the top part of the Santa hat
3. Use the black polish to make the eyes. It can be round or straight like mine.
4. Apply top coat!
6. Swirly Peppermint Candy
I looove mint & peppermint so this season is my favorite because everything is peppermint flavored!
(like the Starbucks peppermint mocha!)
I love candycanes too but the round peppermint candies are also my fav in Christmas!


(Art Nail polish from Daiso)
2. White Polish - for the base
(Paper doll from Ciate Mini)
2. Red Polish - for candy
(Art Nail from Daiso)
Steps:
1. Apply the white polish as a base
2. Use the red polish to make a dot in the middle. This will be the focal point (?) for where you start creating the swirly swirls!
3. Begin creating the outline of the swirly swirl. IT doesn't have to be even but make sure there's a nice space between the red and white.
4. Fill in the sections of the swirls that will be red. If there's anything wiiide white spaces left, add in a few thin red lines!
5. Apply top coat.
7. Santa's Coat French

I like doing French Tip-ish nail arts so when I was thinking of what I could do...
I thought of Santa's coat! It's quite iconic...right?w

1. Black Polish - for Santa's belt
(Art Nail polish from Daiso)2. White Polish - for the details on Santa's coat
(Art Nail polish from Daiso)
3. Red Polish - for Santa's coat
(Art Nail from Daiso)
4. Gold Polish- for Santa's belt buckle
(GL#27 from Arelia)
Steps:

1. Use the red polish to draw the Santa coat
2. Use the black polish to draw the belt
3. Use the white polish to create the fluffiness on the coat
4. Use the gold polish to create a opened rectangle as the buckle.
5. Apply top coat
8. Mistletoe French Tip
I didn't know what the Mistletoe was and the purpose of it for quite a long time...
but it's pretty and it's everywhere on Christmas cards/decorations just like the Christmas wreath! hehe

What I Used:

(Art Nail polish from Daiso)
2. Red Polish - for the bow
(Matte Wine from L'Cret)
3. Green Polish - for the buttons
(Matte Green from L'Cret)
Steps:
1. Create a white tip using the white polish
2. Use the green polish to draw the leaves of the mistletoe near the corner of your nail.
You want the leaf to look zigzaggy and not smooth/straight.
3. Use the red polish to draw the berries (2~3 of them) in the center of the 2 leaves.
Kinda looks like a hidden mickey!
4. Apply top coat
9. Christmas Tree

Christmas isn't complete without a CHRISTMAS TREE!
I grew up decorating the Christmas tree every year with my mom when I was younger...
good times, goooood times~.

What I Used:
2. Green Polish - for the buttons
(Matte Green from L'cret)
3. Star & circle deco - for the tree
(Daiso)

Steps:


10. Gingerbread Man

What I Used
 1. Dark Brown Polish - the gingerbread man
(A139 from PA)
2. White Polish - for the face & body details
(Art Nail polish from Daiso)
3. Red Polish - for the bow
(Art Nail from Daiso)
4. Green Polish - for the buttons
(Art Nail from Daiso)
5. Gold Polish- for the base
(#GL21 from Arelia)
Steps:
1. Set up the guidelines so that you won't make mistakes!
So there's 3 main points to get down.

When you're done with the all the steps...
your hand will be like...
★(o≧□≦)o☆HELLO IT'S CHRISTMAS!!!!!


Do you have a suggestion for my next #naileditfriday?
Leave your suggestions on the comment section below and it might be my next project ❤
I got a request for a tutorial on the previous Sumikko Gurashi nails so... stay tuned ♪
xoxo,
Kiyo
1. Gold Polish- for
(GL#21 from Arelia)2. Green Polish - for the buttons
(Matte Green from L'cret)
3. Star & circle deco - for the tree
(Daiso)
Steps:
1. Using a thin brush, dot where the tip of the tree and the sides will be so that you have a guide line to draw your tree.
2. Connect the dots!
3. Fill in your tree
4. Use the gold polish to draw a diagonal & curvy line down the tree as a decoration
5. Finish off by placing a few colorful circle stones and a star on the tip of the tree!
6. Apply top coat
I LOOOOOVE gingerbread cookies...
so I thought of doing a cute little gingerbread man nail art!
What I Used
(A139 from PA)
2. White Polish - for the face & body details
(Art Nail polish from Daiso)
3. Red Polish - for the bow
(Art Nail from Daiso)
4. Green Polish - for the buttons
(Art Nail from Daiso)
5. Gold Polish- for the base
(#GL21 from Arelia)
Steps:
1. Set up the guidelines so that you won't make mistakes!
So there's 3 main points to get down.
1. Apply a base color (I chose a shimmery gold)
2. Use a the brown polish & a thin brush to create the shape of a gingerbread man
(Imagine a fat stick figure)
3. Use the white polish to create the face & body details of the gingerbread man
4. Use the red polish to create a cute bow. If you want it to be a gingerbread girl you can put the bow on the head!
5. Use the green polish to make 2~3 buttons depending on the size of your gingerbread man
6. Apply top coat!
When you're done with the all the steps...
your hand will be like...
★(o≧□≦)o☆HELLO IT'S CHRISTMAS!!!!!
Hope this tutorial was helpful ♡
I know this is random but while I was doing my nail art, this was in the background
My own Sumikko Gurashi Christmas vers. Tree!!
(with a Sumikko pyramid below it ❤)
(*´ω`)o【★メ☆リ★ク☆リ★】o(´ω`*)
Leave your suggestions on the comment section below and it might be my next project ❤
I got a request for a tutorial on the previous Sumikko Gurashi nails so... stay tuned ♪
xoxo,
Kiyo


0 comments