beautybeauty reviewclearsk facial reviewclearsk singaporereviewv face treatmentv shape facev shape facialv shape no treatmentv shape singaporev shape treatment singapore
[Sponsored x Beauty] ClearSK Signature V-Face Shaper Treatment Review
February/March was filled with new doors opening to me and also a quick update!!! I recently got my confirmation at work! わぁいヽ(ω・ヽ)(ノ・ω)ノ わぁい♪
Thing's got even better when ClearSK and the Sample Store invited me to try their signature V-Face Shaper treatment! I've always dreamed of having a V-face like all the K-Pop stars but I'm too scared to go under the knife and I prefer to find a natural solution = ClearSK!
I'm sure that the name is very self-explanatory but let me introduce you more about the treatment followed by my experience and results!


About ClearSK
ClearSK is the one-stop provider of expert-guided mediaesthetics (Medical Aesthetics) solution for the face and body at reasonable prices. All the treatments and products are designed and tested by medi-aesthetics experts, which means that you're in good hands! ClearSK offers a wide range of medi-skincare and medi-slimming treatments that are personalized and prescribed by aesethetics experts that's personalized to each individual.
So to sum it up... ClearSK offers a no surgery, pain-free and no downtime solution to every individual's needs!
About the V-Face Shaper Treatment
This treatment is safe, quick, and noninvasive which gives you a needle-free alternative! It targets sagging cheeks, double chine, crowfeet, dark circles, and eye bags. The treatment combines Ultrasound waves and unipolar Radio Frequency (RF) to break down and get rid of the fat cells on your face without damaging the tissue types. The results is fat reduction, skin tightening, and facial contouring! There is no side effect or down time, which means you can return to work or school immediately the next day.

I love how it's located right above the Novena MRT station! Super convenient and you won't get lost trying to find the place.
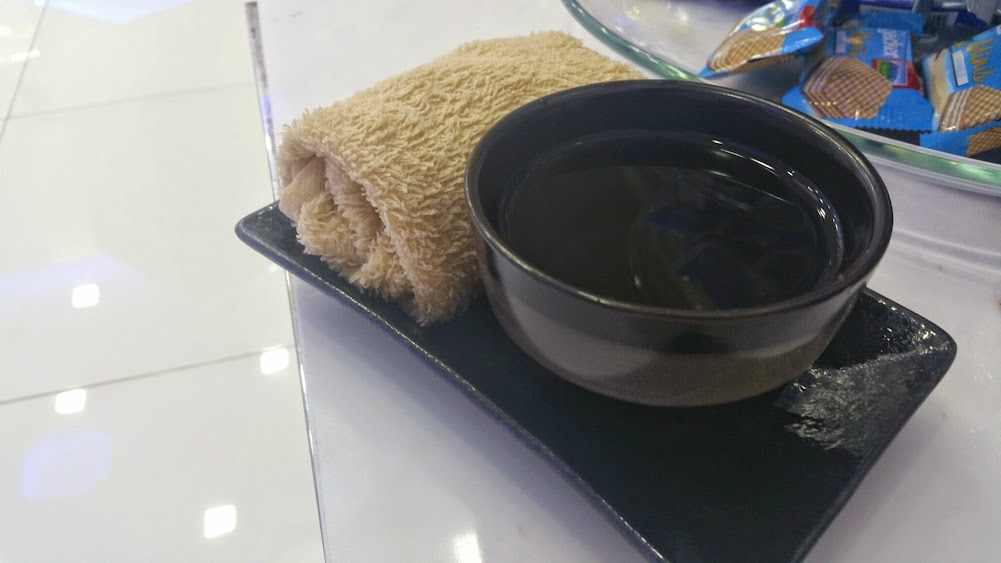
When I first entered the place, I was greeted warmly and like other facial clinics I was required to fill up a form and while I was filling my form I was given a warm drink with a warm towel ♪
 I thought this was super cool because you get to 'check in/check out' of your treatment by scanning your IC card!
(Amazed at how technologically advanced facial clinics have become)

I really like the interior of the place because it looked so simple, professional, and clean.
(Amazed at how technologically advanced facial clinics have become)
I really like the interior of the place because it looked so simple, professional, and clean.


After completing the forms I was lead to the treatment room!


There's a place to put your bag and there's also a mirror that slides out so that you can touch up after the facial. The bed was very comfy and I liked how the room wasn't FREEZING cold. The room temperature was just right with the blanket over me.
After being tucked in by the therapist, she was really considerate and explained every single step of the procedure to me. Besides explaining each step, she'd give me a heads up when she was applying something cold or warm on me so that I won't get a shock.

So let's get started with the treatment procedure!
Duration of the treatment: 20 - 25 minutes*
* The duration may be different depending for each individual*
When I went for my first session, I was informed that I don't have that much fat to burn on my face, which is why she recommended me to focus more on the RF treatment to lift my face. I was surprised because I thought my face still had some excess chubs on it and I was hoping to burn it off (especially the annoying chuck of fat on my chin) but I trusted her advice and went on with the treatment.
Step 1: Double Cleanse
The therapist started off by cleansing my face to remove any makeup,

Step 2: Ultrasound Waves
This is the step that wasn't included for my treatment but let me explain how it goes about!
A thick layer of vaseline is applied to protect the skin and for the machine to glide smoothly. The Ultrasound Waves helps shed off the fat layers and break down the fat cells. You will experience pulsing waves and a warm sensation.

Step 3: Radio Frequency (RF)
If you did the Ultrasound Wave treatment, the therapist will clean your face to remove the vaseline.
Then comes the Radio Frequency (RF) treatment! A thin layer of oil is applied to help the machine slide easily and to protect your skin. The machine is applied in a circular motion and it helps lift up and tighten your skin and also stimulate the production of collagen.. When the machine was first applied, it felt cold but after a while it started to feel warm like a hot stone massage (but slightly cooler) and it was very comfortable to the point where I was starting to doze off.
Then comes the Radio Frequency (RF) treatment! A thin layer of oil is applied to help the machine slide easily and to protect your skin. The machine is applied in a circular motion and it helps lift up and tighten your skin and also stimulate the production of collagen.. When the machine was first applied, it felt cold but after a while it started to feel warm like a hot stone massage (but slightly cooler) and it was very comfortable to the point where I was starting to doze off.
**Be warned for very...'glamorous' shots of myself**


Step 4 : Cool Off with a Mask
After the final RF treatment, the therapist cleansed my skin one last time before applying a mask on my face. I was informed that the treatment tends to dry your skin so that's why a moisturizing Aloe Vera mask was applied. After the mask is applied, they'll dim the lights for you and let you relax for 15 minutes with the soothing music and mask. During my first session I was busy typing up everything the therapist was telling me and also my thoughts on the overall treatment, but during my second treatment I was relaxing and ZZZZ-ing away.


Step 5: Remove the mask and you're done!
After the 15 minutes, the therapist came back to remove the mask and helped apply moisturizer and sunblock on my face to prep me for the rest of the day!
I was informed that after the treatment, it might result in redness, dryness/peeling of the skin, but my skin didn't feel dry and I didn't peel at all. It could be because I followed the therapist's advice to moisturize my face for a few days after the treatment. However, after my first treatment, my kareshi noticed a bit of redness (like suuuuper small red dots?) on the outer right side of my face but it disappeared after a few hours so it didn't really bother me. Somehow the redness didn't come back after the second treatment so I guess it was my skin was just surprised from the new/never-before experience.
Before/After
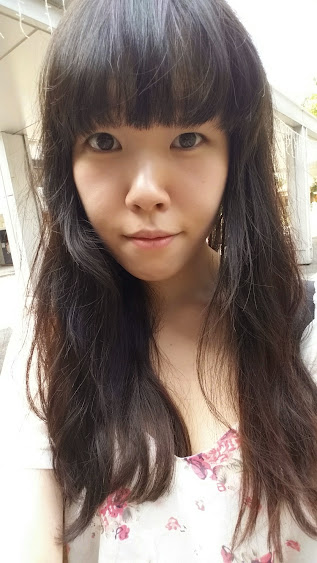
I'm sure this is what you've been waiting for! I took a few before/after pics and I realized that I fail to take identical photos so I'll make sure that I do my homework for my remaining two sessions. T_T
I still think I got a decent amount of before/after shots and the difference I felt and saw so let me start of with the before pics!
Before
I took a few photos before heading to the clinic for my first session!


To be honest I really don't like my chin/jaw-line and that's why I don't really like taking photos of my side profile. I can't really pin point what I don't like about it but I guess to me something feels 'off'.


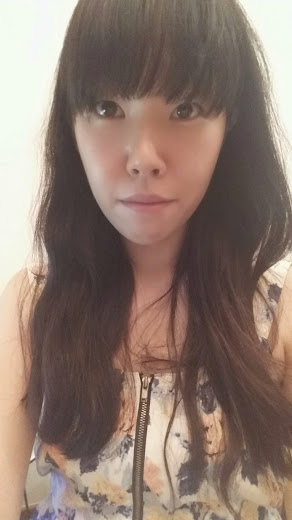
Here's a photo that I took during the treatment!
The face line on the left side (or the side with my bigger eye), is sharper, the outer corner of my mouth is higher, my cheek looks higher, my eyebrow somehow lifted up, and my eyebag is less obvious.

After the first session
I've already shared with you the difference I felt and saw right after the treatment and so I'll share a few more photos after I got home that night.

I couldn't get an exact photo but I think this show the slight difference in my face line and also around my chin. I'm quite impressed since I didn't even use the fat burning machine and I still got results!!


The side of my jawline was more defined after the first treatment as you can see the 'shadowy line' became more visible.

I'm happily pointing to the same spot on my face because... that 'line' or saggy skin on the lower side of my skin was less visible!!!


After the second session
During the second treatment, the therapist focused on lifting up my ENTIRE face (including my forehead and a bit of my chin). Somehow I didn't feel the cooling feeling when the machine touched my skin and immediately felt the warm, hot-stone massage feeling.
I do like what I see ( -ω- )ゥム


My jawline is slowly...slooowly become more visible as the weeks go by.

I'm trying to remember WHY I decided to pose with such an 'ヤンキー' facial expression... I think I was going for the 'Why is this here?' face but it looks more like a 'Where's your lunch money?' face.
(`Д´メ) ← こんな感じ Something like this.
BUT!!! I want to focus on my chin!! Can you tell that the ugly bump is less visible/almost gone?????
It's still chubby when feel ぷにぷに (squishy) when I touch it so hopefully I'll see a bigger change during the next session!
(o^∀^)o ゚+。:.゚ゎクゎク♪゚

My Thoughts
Despite the fact that I focused primarily on the RF treatment, I did see a difference in my face! I felt like my face (especially my cheeks and the corners of my mouth) was lifted up and I felt refreshed after each session! Although there's not a drastic change in my overall face shape, my mom and my work mate commented that my face looked smaller!!!
In terms of the service offered at ClearSK, I thought that the two different therapists I had during my two sessions were both friendly, skilled, and professional. They were both very skilled and I felt like I was in very good hands since I didn't feel any uncomfortable pain during and after each treatment!
Also what I really liked in regards to their service is that they send you a reminder the day via text and if you're booked during a peak period, they'll inform you so that you can remind yourself not to be late if not you'll end up going much later or another day.
Just to throw it out there, I really HATE IT when I got to a facial/massage/etc. places and I'm stuck with the therapist (or sales lady) until I SIGN UP WITH A PACKAGE!!!!!!!! *rips hair out* It annoys the life out of me because I would like to try out the service to see the initial results THEN decide to sign up with a package, regardless of how small or big the results are. Thankfully the kind people at ClearSK are nowhere close to that and they're far from being pushy. The only one time I was recommended a different treatment was when the therapist noticed my HUUUUGE pores while she was cleansing my face (probably felt the 凸凹 on my cheeks) and she shared with me that ClearSK also offers a treatment to tighten the pores. I did express my interest but sine I didn't say anything else after I said 'I'll think about it', she continued on with the treatment and she didn't come up to me to shove a package into my face after the treatment (which earns A LOT of brownie points in my book).
Overall, I really enjoyed my first two sessions at ClearSK in terms of the service, treatment results, and the ambiance!
Each V-Face Shaper treatment is priced at $220 and it would require around 6-12 sessions to maintain and for better results! ClearSK is conveniently located in 12 outlets island-wide (Novena Medical Center, Velocity, Orchard, Toa Payoh, Tampines, Jurong East and 6 upcoming outlets).
Contact them at 6100 6868 or visit their website here to find out more about ClearSK!
Also check out their Facebook page for current promotions and updates!
I still have 2 more sessions to go and I can't wait for the final result! Courtesy of ClearSK, I was also given a free consultation with a dermatologist from ClearSK for a skin analysis. I'm hoping I can utilize it for my 3rd or final session ♪ Stay tuned for the updated post in 2 weeks time!

A HUGE thank you to ClearSK and the Sample Store for giving me the opportunity to try out this amazing treatment ❤ ❤
A HUGE thank you to ClearSK and the Sample Store for giving me the opportunity to try out this amazing treatment ❤ ❤


1 comments
This site does an excellent job breaking down skincare topics while keeping medical accuracy. It’s comforting to read content that feels both professional and empathetic, clearly showing why this clinic is known as the Best Dermatologist in India. Best Dermatologist in India
ReplyDelete